Tuesday, 3 December 2013

Warning: No DNS servers found in Android Eclipse

Mostly new android users face this problem when they install Android eclipse and run any created project than the below error comes on console of android eclipse and project does not run :

Warning: No DNS servers found

It does not mean that your application has any error. See the solution:

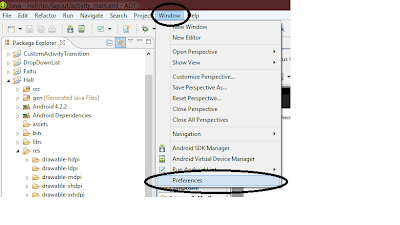
Go to -> Window -> Preferences


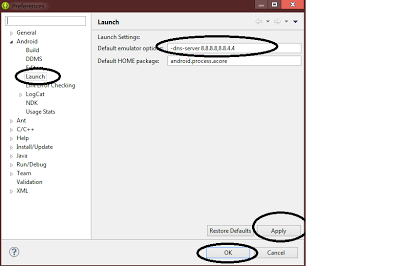
Android -> Launch -> Default Emulator Option ->
paste this:    -dns-server 8.8.8.8,8.8.4.4
than Apply -> OK


Now create any new application and run your project.
Share and help others. Thanks... :)

Thursday, 5 September 2013

Print Receipt Using Bluetooth with Android Phone

Recently, I was asked to make a program for printing some data to a small or handheld Bluetooth printer device. This can be used for printing receipts, simple tickets, or customer notes. I like how it works because usually, we are getting our program output on a computer screen, but  this time we are getting our output on a tangible paper!

I tried everything for printing but my thermal printer was printing only blank paper. At the end I got the issue that is my printer paper is set from the wrong side. Yes that also may be one issue in your case because I went through it . so cheque your paper side if you are getting blank output page.

Now I am going to explain how I  connect to the Bluetooth printer, then make socket connection and then output the string that you put into the edittext.


MainActivity.java - contains button listeners and functions for bluetooth connection, sending data, etc.


 package mmsl.BluetoothFilePrinter;  
 import java.io.BufferedReader;  
 import java.io.FileNotFoundException;  
 import java.io.IOException;  
 import java.io.InputStream;  
 import java.io.InputStreamReader;  
 import java.io.OutputStream;  
 import mmsl.GetPrintableImage.GetPrintableImage;  
 import android.app.Activity;  
 import android.bluetooth.BluetoothSocket;  
 import android.content.ContentValues;  
 import android.content.Intent;  
 import android.graphics.Bitmap;  
 import android.graphics.BitmapFactory;  
 import android.net.Uri;  
 import android.os.Bundle;  
 import android.os.Environment;  
 import android.provider.MediaStore;  
 import android.view.View;  
 import android.view.View.OnClickListener;  
 import android.widget.Button;  
 import android.widget.CheckBox;  
 import android.widget.CompoundButton;  
 import android.widget.CompoundButton.OnCheckedChangeListener;  
 import android.widget.EditText;  
 import android.widget.RadioButton;  
 import android.widget.Toast;  
 public class MainActivity extends Activity {  
  /** Called when the activity is first created. */  
  EditText mNameEditText;  
  EditText mAmountEditText;  
  Button mPrintButton;  
  byte FontStyleVal;  
  private static BluetoothSocket mbtSocket;  
  private static OutputStream mbtOutputStream;  
  private boolean PrintImage = false;  
  int mPrintType = 0;  
  @Override  
  public void onCreate(Bundle savedInstanceState) {  
   super.onCreate(savedInstanceState);  
   setContentView(R.layout.main);  
   mNameEditText = (EditText) findViewById(R.id.nameEditText);  
   mAmountEditText = (EditText) findViewById(R.id.amountEditText);  
   mPrintButton = (Button) findViewById(R.id.printButton);  
   mPrintButton.setOnClickListener(new OnClickListener() {  
    @Override  
    public void onClick(View v) {  
     mPrintType = 0;  
     StartBluetoothConnection();  
    }  
   });  
  }  
  private int[] Readcsv() {  
   try {  
    InputStream in = getAssets().open("logo.txt");// openFileInput();  
    BufferedReader reader = new BufferedReader(  
      new InputStreamReader(in));  
    int[] mona = new int[14926];  
    int cnt = 0;  
    try {  
     String line;  
     while ((line = reader.readLine()) != null) {  
      String[] RowData = line.split(",");  
      for (int i = 0; i < RowData.length; i++) {  
       mona[cnt] = Integer.parseInt(  
         RowData[i].replace("0x", "").replace(" ", ""),  
         16);  
       cnt++;  
      }  
      // do something with "data" and "value"  
     }  
    } catch (Exception ex) {  
     ex.printStackTrace();  
     // handle exception  
    } finally {  
     try {  
      in.close();  
     } catch (IOException e) {  
      // handle exception  
     }  
    }  
    return mona;  
   } catch (Exception e) {  
    return null;  
   }  
  }  
  protected void StartBluetoothConnection() {  
   if (mbtSocket == null) {  
    Intent BTIntent = new Intent(getApplicationContext(),  
      BTWrapperActivity.class);  
    this.startActivityForResult(BTIntent,  
      BTWrapperActivity.REQUEST_CONNECT_BT);  
   } else {  
    // mbtSocket.connect();  
    OutputStream tmpOut = null;  
    try {  
     tmpOut = mbtSocket.getOutputStream();  
    } catch (IOException e) {  
     e.printStackTrace();  
    }  
    mbtOutputStream = tmpOut;  
    senddatatodevice();  
   }  
  }  
  private void senddatatodevice() {  
   try {  
    mbtOutputStream = mbtSocket.getOutputStream();  
    switch (mPrintType) {  
    case 0:  
     byte[] Command = { 0x1B, 0x21, FontStyleVal };  
     mbtOutputStream.write(Command);  
     String sendingmessage = "Name : "  
       + mNameEditText.getText().toString();  
     byte[] send = sendingmessage.getBytes();  
     mbtOutputStream.write(send);  
     mbtOutputStream.write(0x0D);  
     sendingmessage = "Amount : "  
       + mAmountEditText.getText().toString();  
     send = sendingmessage.getBytes();  
     mbtOutputStream.write(send);  
     mbtOutputStream.write(0x0D);  
     mbtOutputStream.write(0x0D);  
     mbtOutputStream.write(0x0D);  
     mbtOutputStream.write(0x0D);  
     mbtOutputStream.flush();  
     break;  
      default:  
     break;  
    }  
    // outstream.write(0);  
    // mbtOutputStream.close();  
    // mbtOutputStream.flush();  
   } catch (IOException e) {  
    e.printStackTrace();  
   }  
  }  
  @Override  
  protected void onDestroy() {  
   super.onDestroy();  
   try {  
    if (mbtSocket != null) {  
     mbtOutputStream.close();  
     mbtSocket.close();  
     mbtSocket = null;  
    }  
   } catch (IOException e) {  
    e.printStackTrace();  
   }  
  }  
  @Override  
  protected void onActivityResult(int requestCode, int resultCode, Intent data) {  
   super.onActivityResult(requestCode, resultCode, data);  
   switch (requestCode) {  
   case BTWrapperActivity.REQUEST_CONNECT_BT:  
    try {  
     mbtSocket = BTWrapperActivity.getSocket();  
     if (mbtSocket != null) {  
      if (PrintImage == false) {  
       Thread.sleep(100);  
       senddatatodevice();  
      }  
     }  
    } catch (Exception e) {  
     e.printStackTrace();  
    }  
    break;  
   }  
  }  
 }  


BTWrapperActivity:- check the Bluetooth connection and list all the available Bluetooth devices in the rage of you phone. Select the name of the Bluetooth printer and it automatically create one socket connection with that device and send the data byte by byte.


 package com.trust.trust_bank;

import java.io.IOException;
import java.lang.reflect.InvocationTargetException;
import java.lang.reflect.Method;
import java.util.Set;
import java.util.UUID;

import android.app.ListActivity;
import android.bluetooth.BluetoothAdapter;
import android.bluetooth.BluetoothDevice;
import android.bluetooth.BluetoothSocket;
import android.content.BroadcastReceiver;
import android.content.Context;
import android.content.Intent;
import android.content.IntentFilter;
import android.os.Bundle;
import android.view.Menu;
import android.view.MenuItem;
import android.view.View;
import android.widget.ArrayAdapter;
import android.widget.ListView;
import android.widget.Toast;

// =============== Basically is a state machine, and the communications will happen in a separate thread so as not to obstruct the main UI

public class BTWrapperActivity extends ListActivity{

 static public final int REQUEST_CONNECT_BT = 0x2300;

 static private final int REQUEST_ENABLE_BT = 0x1000;

 static private BluetoothAdapter mBluetoothAdapter = null;

 static private ArrayAdapter<String> mArrayAdapter = null;

 //static private Set<BluetoothDevice> btDevices = null;
 static private ArrayAdapter<BluetoothDevice> btDevices = null;//BluetoothDevice[] btDevices = null; 
 private BluetoothDevice btDevices1=null;
 // Unique UUID for this application, Basically the SPP Profile
 private static final UUID SPP_UUID = 
  // UUID.fromString("fa87c0d0-afac-11de-8a39-0800200c9a66");
  UUID.fromString("00001101-0000-1000-8000-00805F9B34FB");

 static private BluetoothSocket mbtSocket = null;

 @Override
 public void onCreate(Bundle savedInstanceState) {
  super.onCreate(savedInstanceState);

  // Change the title of the activity
  setTitle("Bluetooth Devices");

  // Get the List of paired and available devices
  try {
   if(initDevicesList() != 0) {
    this.finish();
    return;
   }

  } catch(Exception ex) {
   this.finish();
   return;
  }

  // Register the Broadcast receiver for handling new BT device discovery
  IntentFilter btIntentFilter = new IntentFilter(BluetoothDevice.ACTION_FOUND);
  registerReceiver(mBTReceiver, btIntentFilter);
 }

 public static BluetoothSocket getSocket() {
  return mbtSocket;
 }

 private void flushData() {
  try {
   if(mbtSocket != null) {
    mbtSocket.close();
    mbtSocket = null;
   }

   if(mBluetoothAdapter != null) {
    mBluetoothAdapter.cancelDiscovery();
   }

   if(btDevices != null) {
    btDevices.clear();
    btDevices = null;
   }

   if(mArrayAdapter != null) {
    mArrayAdapter.clear();    
    mArrayAdapter.notifyDataSetChanged();
    mArrayAdapter.notifyDataSetInvalidated();
    mArrayAdapter = null;
   }

   finalize();

  } catch(Exception ex){} 
  catch (Throwable e) {}

 }


 // Do not forget to add the permission for Bluetooth to use this method
 // Also this method is very tightly coupled with the above method, for getting the status of bt connection 

 private int initDevicesList() {

  // Flush any Pending Data
  flushData();

  // Get the Bluetooth Adaptor of the device
  mBluetoothAdapter = BluetoothAdapter.getDefaultAdapter();
  if(mBluetoothAdapter == null) {
   // Weird Condition ==== Implies that the device does not have a bluetooth module ?????
   Toast.makeText(getApplicationContext(), "Bluetooth not supported!!", Toast.LENGTH_LONG).show();    
   return -1;
  }

  if(mBluetoothAdapter.isDiscovering()) {
   mBluetoothAdapter.cancelDiscovery();
  }

  mArrayAdapter = new ArrayAdapter<String>(getApplicationContext(), android.R.layout.simple_list_item_1);

  mArrayAdapter.setDropDownViewResource(android.R.layout.simple_dropdown_item_1line);
  
  
  setListAdapter(mArrayAdapter);


  // get the list of devices already paired
  Intent enableBtIntent = new Intent(BluetoothAdapter.ACTION_REQUEST_ENABLE);
  try {
   startActivityForResult(enableBtIntent, REQUEST_ENABLE_BT);
  } catch(Exception ex){
   //ex.getStackTrace();
   return -2;
  }


  Toast.makeText(getApplicationContext(), "Getting all available Bluetooth Devices", Toast.LENGTH_SHORT).show();

  return 0;

 } // End getDeviceList


 @Override
 protected void onActivityResult(int reqCode, int resultCode, Intent intent) {
  super.onActivityResult(reqCode, resultCode, intent);

  switch(reqCode) {
  case REQUEST_ENABLE_BT:

   if(resultCode == RESULT_OK) {
    // Start getting the paired devices list
    Set<BluetoothDevice> btDeviceList = mBluetoothAdapter.getBondedDevices();
    // If there are paired devices
    try {
     if (btDeviceList.size() > 0) {

      // Loop through paired devices
      for (BluetoothDevice device : btDeviceList) {
       if(btDeviceList.contains(device) == false) {

        btDevices.add(device); // Add the device to the device list

        // Add the name and address to an array adapter to show in a ListView
        mArrayAdapter.add(device.getName() + "\n" + device.getAddress() /*+ "\n" + "Status : Paired"*/);
        //mArrayAdapter.notifyDataSetChanged();
        mArrayAdapter.notifyDataSetInvalidated();
       }
      }
     }
    } catch(Exception ex){}
   }


   break;
  }

  // Also register for new devices which are discovered
  mBluetoothAdapter.startDiscovery();

 } // End onActivityResult

 private final BroadcastReceiver mBTReceiver = new BroadcastReceiver() {

  @Override
  public void onReceive(Context context, Intent intent) {
   String action = intent.getAction();
   // When discovery finds a device
   if (BluetoothDevice.ACTION_FOUND.equals(action)) {
    // Get the BluetoothDevice object from the Intent
    BluetoothDevice device = intent.getParcelableExtra(BluetoothDevice.EXTRA_DEVICE);

    try{     

     // No paired device found
     if(btDevices == null )
     {    
      btDevices = new ArrayAdapter<BluetoothDevice>(getApplicationContext(), android.R.id.text1);      
     }

     // Ensure non repetability
     if( btDevices.getPosition(device) < 0 ) {
      btDevices.add(device);     
      // Add the name and address to an array adapter to show in a ListView
      mArrayAdapter.add(device.getName() + "\n" + device.getAddress() +"\n" /*+ "Status : Unpaired"*/);
      //mArrayAdapter.notifyDataSetChanged();
      mArrayAdapter.notifyDataSetInvalidated();
     }
    } catch(Exception ex) 
    {
     //ex.fillInStackTrace();
    }
   }
  }
 };

 @Override
 protected void onListItemClick(ListView l, View v, final int position, long id) {
  super.onListItemClick(l, v, position, id);

  // Dont proceed if the bluetooth adapter is not valid
  if(mBluetoothAdapter == null) {
   return;
  }

  // Cancel the dicovery if still going on
  if(mBluetoothAdapter.isDiscovering()) {   
   mBluetoothAdapter.cancelDiscovery();
  }

  // Try to connect with the selected device,
  Toast.makeText(getApplicationContext(), "Connecting to " + btDevices.getItem(position).getName() + "," + btDevices.getItem(position).getAddress(), Toast.LENGTH_SHORT).show();

  // made the thread different as the connecting proceedure might break down the system
  Thread connectThread = new Thread(new Runnable() {

   @Override
   public void run() {
    try {
     try {
      Method m = btDevices.getItem(position).getClass().getMethod("createInsecureRfcommSocket", 
        new Class[] {int.class});
      try {
       //================================================================
       
       String address=btDevices.getItem(position).toString();
       mBluetoothAdapter.getRemoteDevice(address);
       btDevices1=mBluetoothAdapter.getRemoteDevice(address);
      UUID uuid = UUID.fromString("00001101-0000-1000-8000-00805f9b34fb");
       mbtSocket = btDevices1.createRfcommSocketToServiceRecord(uuid);
       mbtSocket.connect();
       //=================================================================
       //mbtSocket = (BluetoothSocket) m.invoke(btDevices.getItem(position), 1);
       //m.invoke(receiver, args)
      } catch (IllegalArgumentException e) {
       e.printStackTrace();
      } /*catch (IllegalAccessException e) {
       e.printStackTrace();
      } catch (InvocationTargetException e) {
       e.printStackTrace();
      } */
     } catch (SecurityException e) {
      e.printStackTrace();
     } catch (NoSuchMethodException e) {
      e.printStackTrace();
     } 
    // mbtSocket = btDevices.getItem(position).createRfcommSocketToServiceRecord(SPP_UUID);
     
    // mbtSocket.connect();
    } catch(IOException ex) {
     //Toast.makeText(getApplicationContext(), "Unable to connect to " + btDevices.getItem(position).getName(), Toast.LENGTH_LONG).show();
     runOnUiThread(socketErrorRunnable);
     //Handler myHandler = new Handler();
     //myHandler.post(socketErrorRunnable);
     try {
      mbtSocket.close();
     } catch (IOException e) {
      //e.printStackTrace();
     }
     mbtSocket = null;
     return;
    } finally {
     runOnUiThread(new Runnable() {

      @Override
      public void run() {
       //flushData();
       unregisterReceiver(mBTReceiver);
       finish();

      }
     });
    }
   }
  });

  connectThread.start();
 }

 private Runnable socketErrorRunnable = new Runnable() {

  @Override
  public void run() {
   Toast.makeText(getApplicationContext(), "Cannot establish connection", Toast.LENGTH_SHORT).show();
   mBluetoothAdapter.startDiscovery();

  }
 };

 @Override
 public boolean onCreateOptionsMenu(Menu menu) {
  super.onCreateOptionsMenu(menu);

  // Add the menu options
  menu.add(0, Menu.FIRST, Menu.NONE, "Refresh Scanning");

  return true;
 }

 @Override
 public boolean onOptionsItemSelected(MenuItem item) {
  super.onOptionsItemSelected(item);

  switch(item.getItemId()) {
  case Menu.FIRST:
   initDevicesList();
   break;
  }

  return true;
 }
} // End of class definition


Main.xml:- contains the layout of the app.


 <?xml version="1.0" encoding="utf-8"?>  
 <ScrollView xmlns:android="http://schemas.android.com/apk/res/android"  
   android:layout_width="fill_parent"  
   android:layout_height="fill_parent" >  
   <LinearLayout  
     android:layout_width="fill_parent"  
     android:layout_height="fill_parent"  
     android:orientation="vertical" >  
     <TableRow  
       android:id="@+id/TableRow01"  
       android:layout_width="fill_parent"  
       android:layout_height="wrap_content" >  
       <TextView  
         android:id="@+id/nameTextView"  
         android:layout_width="wrap_content"  
         android:layout_height="wrap_content"  
         android:text="Enter Name  : " >  
       </TextView>  
       <EditText  
         android:id="@+id/nameEditText"  
         android:layout_width="fill_parent"  
         android:layout_height="wrap_content"  
         android:singleLine="true"  
         android:text="" >  
       </EditText>  
     </TableRow>  
     <TableRow  
       android:id="@+id/TableRow02"  
       android:layout_width="fill_parent"  
       android:layout_height="wrap_content" >  
       <TextView  
         android:id="@+id/amountTextView"  
         android:layout_width="wrap_content"  
         android:layout_height="wrap_content"  
         android:text="Enter Amount : " >  
       </TextView>  
       <EditText  
         android:id="@+id/amountEditText"  
         android:layout_width="fill_parent"  
         android:layout_height="wrap_content"  
         android:numeric="decimal"  
         android:singleLine="true"  
         android:text="" >  
       </EditText>  
     </TableRow>  
           <Button  
             android:id="@+id/printButton"  
             android:layout_width="fill_parent"  
             android:layout_height="wrap_content"  
             android:text="Print Form" >  
           </Button>  
     </LinearLayout>  
     </ScrollView>  


Note :-Most importantally you have to take the permission of Bluetooth access. Without taking permission you cannot access Bluetooth of your phone. And app will crash automatically.


Add below code into the manifest.xml:-


 <uses-permission android:name="android.permission.BLUETOOTH"></uses-permission>  
 <uses-permission android:name="android.permission.BLUETOOTH_ADMIN"></uses-permission>  

Hope this code will help someone...

Happy coding....:)

BlueStacks: The app player for windows

It is a windows application which could run the android app.You might be asking what is the point my android emulator can do this? you are right but how is your emulator performance? can you play 3d games on emulator? the quick answer is no or its too slow. Yes it is slow because android emulator is nothing but a modified qemu( famous cross platfor emulator).In emulator  is complete  emulation of ARM architechture so for executing an typical android application there will be two converstions first from dalvik to arm them arm to i386/amd64 , in order to catchup these conversions the app will crawl.

As far from my understanding(from offical tweets ) Bluestack is using combination of both virtualization and native code implementation.

I personally use BlueStacks for debugging, its is really fast as compare to native emulator.

Animation between activity switching

For most of the android apps we do have multiple activities and when we start another activity either we get no animation (in older devices) or  a left-right translation. It is not so cool for a stylish app. 

So, the code to change the animation between two Activities is very simple: just call the overridePendingTransition() from the current Activity, after starting a new Intent. This method is available from Android version 2.0 (API level 5), and it takes two parameters, that are used to define the enter and exit animations of your current Activity. Here’s an example:

startActivity(new Intent(this, NewActivity.class));         
overridePendingTransition(R.anim.push_left_in,R.anim.push_out_up);   


These two parameters are resource IDs for animations defined with XML files (one for each animation). These files have to be placed inside the app’s res/anim folder. 

push_left_in.xml:-


 <?xml version="1.0" encoding="utf-8"?>   
 <set xmlns:android="http://schemas.android.com/apk/res/android">   
  <translate android:fromXDelta="100%p" android:toXDelta="0" android:duration="300"/>   
  <alpha android:fromAlpha="0.0" android:toAlpha="1.0" android:duration="300" />   
  </set>   

push_out_up.xml:-

 <?xml version="1.0" encoding="utf-8"?>   
 <set xmlns:android="http://schemas.android.com/apk/res/android">    
 <translate android:fromXDelta="100%p" android:fromYDelta="100%p" android:toXDelta="0" android:toXDelta="0" android:duration="300"/>   
 </set>   

The first xml code makes slides the View diagonally. The second one slides the View to the left and then up. 

Wednesday, 4 September 2013

Write Code for Different Android Versions in Your App

Fragmentation has been a big issue in Android since the beginning and everyone has different views about it. I personally don't think that there is an effective way to avoid fragmentation at the rate Android is growing at. 

it's actually not that hard to write code that handle different Android versions inside your application. I know, we can always publish different apks to handle different android versions, but this may not be the optimal choice in all cases. So, here is little code snippet showing how to handle fragmentation to a certain extent in Android:

 @SuppressLint("NewApi")  
  @Override  
  public boolean onCreateOptionsMenu(Menu menu) {  
  MenuInflater inflater = getMenuInflater();  
  inflater.inflate(R.menu.menu, menu);  
  return true;  
  }  

The above code is just a simple example, that shows how you can create different menu options for different Android versions.

Now you will have the question in mind that which will better between @SuppressLint 'NewApi' and @TargetApi(GINGERBREAD)

Answer is @TargetApi amd @SuppressLint have the same core effect: they suppress the Lint error.


The difference is that with @TargetApi, you declare, via the parameter, what API level you have addressed in your code, so that the error can pop up again if you later modify the method to try referencing something newer than the API level cited in @TargetApi.


Happy Coding.....:)

Number Picker Dialog


A widget that enables the user to select a number form a predefined range. There are two flavors of this widget and which one is presented to the user depends on the current theme.

activity_main.xml:


 <RelativeLayout xmlns:android="http://schemas.android.com/apk/res/android"  
   xmlns:tools="http://schemas.android.com/tools"  
   android:layout_width="match_parent"  
   android:layout_height="match_parent"  
  >  
   <NumberPicker  
     android:id="@+id/numberPicker1"  
     android:layout_width="wrap_content"  
     android:layout_height="wrap_content"  
     android:layout_alignParentLeft="true"  
     android:layout_alignParentTop="true"  
     android:layout_marginLeft="78dp" />  
   <Button  
     android:id="@+id/button1"  
     android:layout_width="wrap_content"  
     android:layout_height="wrap_content"  
     android:layout_alignParentLeft="true"  
     android:layout_centerVertical="true"  
     android:layout_marginLeft="40dp"  
     android:text="Show Selected Number" />  
 </RelativeLayout>  

MainActivity.java:

 import android.app.Activity;  
 import android.os.Bundle;  
 import android.view.View;  
 import android.view.View.OnClickListener;  
 import android.widget.Button;  
 import android.widget.NumberPicker;  
 import android.widget.Toast;  
 public class MainActivity extends Activity {  
  NumberPicker np;  
  @Override  
  protected void onCreate(Bundle savedInstanceState) {  
  super.onCreate(savedInstanceState);  
  setContentView(R.layout.activity_main);  
  np = (NumberPicker) findViewById(R.id.numberPicker1);  
  np.setMaxValue(10);  
  np.setMinValue(1);  
  Button b = (Button) findViewById(R.id.button1);  
  b.setOnClickListener(new OnClickListener() {  
   @Override  
   public void onClick(View arg0) {  
   // TODO Auto-generated method stub  
   int number = np.getValue();  
   Toast.makeText(getApplicationContext(),  
    "value is :" + number, 3000).show();  
   }  
  });  
  }  
 }  

Output:


Happy coding....:)

XML Pull Parser

As I told in my previous post The Java programming language provides several standard libraries for processing XML files. The SAX and the DOM XML parsers are also available on Android.


The Java standard provides also the Stax parser. This parser is not part of the Android platform.


On Android it is recommended to use the XmlPullParser. It has a relatively simple API compared to SAX and DOM and is fast and requires less memory then the DOM API.

  • There are two key methods: next() and nextToken(). While next() provides access to high level parsing events, nextToken() allows access to lower level tokens.
  • The current event state of the parser can be determined by calling the  getEventType() method. Initially, the parser is in the START_DOCUMENT state.
  • The method next() advances the parser to the next event.
     The int value returned from next determines the current parser state and is identical
    to the value returned from following calls to getEventType ().

Th following event types are seen by next()
START_TAG
An XML start tag was read.
TEXT
Text content was read; the text content can be retrieved using the getText() method. (when in validating mode next() will not report ignorable whitespace, use nextToken() instead)
END_TAG
An end tag was read
END_DOCUMENT
No more events are available
Exmple:-

 import java.io.IOException;  
  import java.io.StringReader;  
  import org.xmlpull.v1.XmlPullParser;  
  import org.xmlpull.v1.XmlPullParserException.html;  
  import org.xmlpull.v1.XmlPullParserFactory;  
  public class SimpleXmlPullApp  
  {  
    public static void main (String args[])  
      throws XmlPullParserException, IOException  
    {  
      XmlPullParserFactory factory = XmlPullParserFactory.newInstance();  
      factory.setNamespaceAware(true);  
      XmlPullParser xpp = factory.newPullParser();  
      xpp.setInput(new StringReader ("<foo>Hello World!</foo>"));  
      int eventType = xpp.getEventType();  
      while (eventType != XmlPullParser.END_DOCUMENT) {  
      if(eventType == XmlPullParser.START_DOCUMENT) {  
        System.out.println("Start document");  
      } else if(eventType == XmlPullParser.END_DOCUMENT) {  
        System.out.println("End document");  
      } else if(eventType == XmlPullParser.START_TAG) {  
        System.out.println("Start tag "+xpp.getName());  
      } else if(eventType == XmlPullParser.END_TAG) {  
        System.out.println("End tag "+xpp.getName());  
      } else if(eventType == XmlPullParser.TEXT) {  
        System.out.println("Text "+xpp.getText());  
      }  
      eventType = xpp.next();  
      }  
    }  
  }   


Happy Coding....:)

XML Parsing In Android

Introduction :-
There are two kinds of parsing in android
1) DOM Parsing
2) SAX Parsing
I used Dom parser in my android project because a DOM parser is rich in functionality. It creates a DOM tree in memory and allows you to access any part of the document repeatedly and allows you to modify the DOM tree.
Building the Sample
My xml format is:-
 <item>  
 <question id="1" >  
 <name>Question 1</name>  
 <option id="341">  
 <name>option 1</name>  
 </option>  
 <option id="342" >  
 <name>option 2</name>  
 </option>  
 </question>  
 </item>  

1) name the above xml as  “xml.xml”. 2) save this in raw folder.

Running the Sample

1) First of all initialize array list for saving the node items.

2) Then Initialize InputStream is a readable source of bytes.

3) Initialize Document Builder that defines the API to obtain DOM Document instances from an XML document. Using this class, an application programmer can obtain a document from XML.

4) Initialize document, The Document interface represents the entire  XML document. Conceptually, it is the root of the document tree, and provides the primary access to the document’s data.

5) Initialize node list with the tag name which u want to retrieve. The NodeList interface provides the abstraction of an ordered collection of nodes. Java code for parsing XML :- 


 ArrayList<String> childItems = new ArrayList<String>();  
 InputStream is = getResources().openRawResource(R.raw.xml);  
 DocumentBuilder builder = DocumentBuilderFactory.newInstance().newDocumentBuilder();  
 Document doc = builder.parse(is, null);  
 doc.getDocumentElement().normalize();  
 NodeList nodeListQuestion = doc.getElementsByTagName("question");  
 After that we have to use loop for repeated search of nodes. At last we get all the items in one array list then we can use them when we needed.  
 for (int i = 0; i < nodeListQuestion.getLength(); i++) {  
 Node node = nodeListQuestion.item(i);  
 Element fstElmnt = (Element) node; NodeList nameList = fstElmnt.getElementsByTagName("name");  
 Element nameElement = (Element) nameList.item(0);  
 nameList = nameElement.getChildNodes();  
 items.add(((Node) nameList.item(0)).getNodeValue().toString());  
 if (node.getChildNodes().getLength() >= 1) {  
 NodeList listChilds = node.getChildNodes();  
 for (int j = 0; j < node.getChildNodes().getLength(); j++) {               Node child = listChilds.item(j);  
 Element fstElmnt1 = (Element) node;  
 NodeList nameList1 = fstElmnt1.getElementsByTagName("option");  
 Element nameElement1 = (Element) nameList1.item(0);  
 if (child.getNodeType() == Node.ELEMENT_NODE) {  
 if (child.getNodeName().equals("option")) {  
 String childName = child.getNodeName();  
 String childValue = ((Element) child).getTextContent();  
 childItems.add(childValue);  
 }  
 }  
 }  
 }  
 }  

Hope this post helps someone… :)


Happy Coding

New version of android called Android KitKat

Android is the operating system that powers over 1 billion smartphones and tablets. Since these devices make our lives so sweet, each Android version is named after a dessert: Cupcake, Donut, Eclair, Froyo, Gingerbread, Honeycomb, Ice Cream Sandwich, and Jelly Bean. As everybody finds it difficult to stay away from chocolate They decided to name the next version of Android after one of our favorite chocolate treats, Kitkat®!


Happy coding with Sweet guest  :)